Introduction
Here we describe a method for checking collisions between arbitrary objects drawn by the GPU. The objects are not limited to any shape, complexity or orientation. The objects that are checked for collisions can be the same objects that are drawn on the screen. The algorithm is pixel perfect but without further refining is limited to 2D collisions.
Description
The algorithm can be divided in three separate steps:
-
Determine which objects need testing
-
Set up the GPU buffers and draw the first object so the stencil buffer is set
-
Make an occlusion query using the and using the stencil from the previous buffer
If the occlusion query returns any pixels were drawn, the two objects overlap.
Determining objects that need to be tested
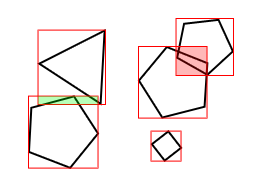
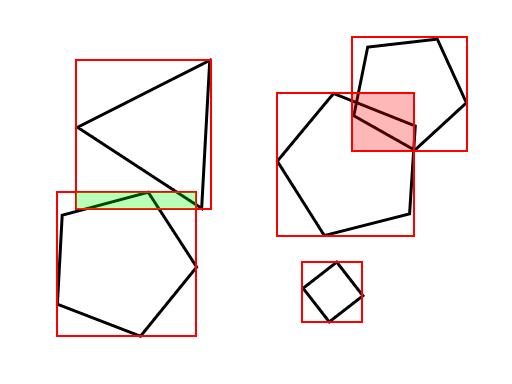
Figure 1.
To speed up the algorithm, we need to eliminate object pairs that can’t overlap. This can be done by projecting the object bounding volumes in screen space. Then, we can quickly check which 2D polygons overlap and do further checking. Choosing the shape of the bounding volumes/polygons is not relevant. In this document we will use rectangles for the simplicity.
The example case in figure 1 shows two colliding objects (overlapping bounding rectangles shown red), one near hit (green overlap) and one object with no collisions or bounding rectangle overlap. To determine the collisions (and non-collisions) we need checks for every bounding rectangle (15 checks) and two checks using the GPU. Without the use of the bounding rectangles, we would need 13 more checks on the GPU.
The bounding rectangles in the example can be generated by finding the maximum and minimum coordinates and using them as the corner points of the rectangle. Since the algorithm finds collisions as seen from the camera, we need first project the object coordinates (or the object bounding volume coordinates) on the screen and find the minima and maxima using those coordinates. Most 3D frameworks provide functions for projecting a 3D point to screen coordinates using the same transformations as seen on screen.
Drawing objects
Before we start drawing the objects on the graphics buffer, we need to clear the stencil buffer. After that, the GPU should be set to draw only to the stencil buffer, that is we don’t need the color buffer or depth buffer to be updated.
Now, the first object can be drawn. After that, we will draw the second object. Before we start we need to set up the occlusion query to count the drawn pixels. We also need to use the stencil buffer created in the previous step and set the GPU to draw only if the stencil buffer is non-zero. We don’t need to update any buffers at this point.
After the second object is drawn, the pixel count returned by the occlusion query tells how many pixels overlap. For most purposes, we can assume a non-zero value means the two objects collide.

Figure 2. |

Figure 3. |

Figure 4. |
Consider the above example. Figure 2 shows two objects as seen on screen. Figure 3 shows the stencil derived by drawing only the green (right) object. Figure 4 shows what will be drawn of the red (left) object if we limit the rendering to drawing on the stencil (the occlusion query will tell us six pixels were drawn).
Sprites
For sprite objects that consist of only one quad and an alpha blended texture with transparent area representing the area that cannot collide with anything, the same result can be achieved by setting the alpha testing to discard pixels below a certain tolerance. This will then avoid updating the stencil buffer on the whole area of the quad.
Optimizations
The stencil buffer can be created to contain the collision area of e.g. every enemy currently on the screen and then testing with the player object. This avoids the necessity to test between every object individually, which can be costly since the occlusion query has to finish before the next query can start. If the objects on the screen can be grouped to a handful of categories, such as the player, the enemies, player bullets and so on, multiple objects can be tested simultaneously where it is not important to know exactly which two objects collided (e.g. when deciding whether to kill the player which in a shooter game generally is because the player collides with the background, an enemy bullet or an enemy — all of which would be drawn in the same stencil buffer).
Ideally, the above can be done so that every object group has its own stencil buffer. This then makes it possible to create the stencil and start the queries in their respective buffers, do something useful while they execute and then query for the occlusion query results.
Caveats
Most of all, doing collision detection with occlusion queries is admittedly a curiosity. There are many, many ways to do collisions faster and most likely with less technicalities. Using a simple rectangle (a cube or a sphere in 3D applications) to test collisions between complex objects has been used since the first video games and it still provides acceptable accuracy. Indeed, some games even use an extremely small collision area (e.g. a single pixel) to test collisions with larger objects with great success. Additionally, the algorithm is potentially a bottleneck, especially when triple buffering etc. are used since occlusion queries generally are started after the previous frame is drawn and then read when the next frame is drawn (i.e. it’s asyncronous). This limits either the algorithm accuracy for real time (frame accuracy) or the framerate since we may have to wait for the query to finish for a relatively long time.
A serious consideration is to use the occlusion query algorithm to test between a complex object, e.g. with a large end of level boss with a complex, changing shape and use a simpler geometry based algoritm to test between hundreds of bullets. A hybrid algorithm could even first make an occlusion query to know which objects collide and then use a different algorithm to find out more about the collision.
This is inherently a 2D algorithm. The GPU sees any situations in which two objects overlap as a collision, as seen from the location of the camera. This if fine for side-scrollers et cetera, which also benefit from pixel perfect (fair, predictable) collisions, and other situations in which all the objects to be tested are on the same plane. Multiple depth levels (e.g. foreground objects never collide with background items) improve the situation and so does drawing only the parts of the objects that are between specified depth levels.
Another possible problem is that the screen resolution may be different between systems, which makes the algorithm have different levels of accuracy. This can be avoided by doing the checks in a fixed resolution. Limiting the collision buffer resolution also improves the algorithm speed in cases the GPU fillrate is a bottleneck.
Finally, some older systems may not support occlusion queries or stencil buffers. As of 2008, this is increasingly rare but should be taken into consideration.
Appendix A. Source code for OpenGL
The following is source code extracted from a proof of a concept/prototype game written in C++ using OpenGL. The source code should be self explanatory.
The following builds the bounding rectangle for a object:
BoundBox box=object->GetBoundingBox();

object->DoObjectTranslations();

glGetDoublev(GL_MODELVIEW_MATRIX, modelViewMatrix);
glGetDoublev(GL_PROJECTION_MATRIX, projectionMatrix);
glGetIntegerv(GL_VIEWPORT, viewport);

for (int i=0;i<8;i++)
{
    GLdouble screenX, screenY, screenZ;

    vec3 c=box.Corner(i);

    gluProject(c.x(), c.y(), c.z(),
        modelViewMatrix, projectionMatrix, viewport,
        &screenX, &screenY, &screenZ);

    maxX=max((int)screenX,maxY);
    maxY=max((int)screenY,maxY);
    minX=min((int)screenX,minX);
    minY=min((int)screenY,minY);
}

rect = Rect(minX,minY,maxX-minX, maxY-minY);
The following can be used to set the rendering mode before drawing the object on the screen, on the stencil buffer or when making the occlusion query (note how we disable most of the rendering when drawing something that will not be visible to the player, also notice how the stencil buffer is cleared if we enable stencil drawing mode — using scissor makes this efficient):
void GfxManager::SetRenderMode(RenderMode mode) {
  if (mode==STENCIL) {
    glDepthFunc(GL_ALWAYS);
    glDisable(GL_LIGHTING);
    glClear(GL_STENCIL_BUFFER_BIT);
    glEnable(GL_STENCIL_TEST);
    glDisable(GL_DEPTH_TEST);
    glStencilFunc(GL_ALWAYS, 1, 1);
    glStencilOp(GL_REPLACE, GL_REPLACE, GL_REPLACE);
    glColorMask(0,0,0,0);
  } else if (mode==OCCLUSION) {
    glDepthFunc(GL_ALWAYS);
    glDisable(GL_DEPTH_TEST);
    glDisable(GL_LIGHTING);
    glEnable(GL_SCISSOR_TEST);
    glEnable(GL_STENCIL_TEST);
    glStencilFunc(GL_EQUAL, 1, 1);
    glStencilOp(GL_KEEP, GL_KEEP, GL_KEEP);
    glColorMask(0,0,0,0);
    glBeginQueryARB(GL_SAMPLES_PASSED_ARB, m_OccId);
  } else {
    // Set normal rendering mode here (enable lighting etc.)
  }
}
Similarly, the following is used to end drawing (specifically to end the collision testing, at which the function returns the number of pixels drawn)…
int GfxManager::FinishRenderMode(RenderMode mode) {
  if (mode==OCCLUSION) {
    glEndQueryARB( GL_SAMPLES_PASSED_ARB );
    GLuint occ=0;
    glGetQueryObjectuivARB( m_OccId, GL_QUERY_RESULT_ARB, &occ);
    return (int)occ;
  } else {
    return 0;
  }
}
… using something like this:
int GfxManager::DrawObject(int oid,vec3 pos,vec3 rot,RenderMode mode) {
  SetRenderMode(mode);
  Draw3DObject(oid, pos, rot);
  return FinishRenderMode(mode);
}
This is from the main loop, it simply goes through all objects in the game. Notice how we first prepare the collision checking for the first object to be tested (i.e. create the stencil as in step 2 of the algorithm).
for (unsigned int a=0;a<m_Objects.size();a++) {
  m_Objects[a]->PrepareCollide();
  for (unsigned int b=a+1;b<m_Objects.size();b++) {
    if (m_Objects[a]->TestCollide(m_Objects[b])) {
      // We have a collision
    }
  }
  m_Objects[a]->FinishCollide();
}
Note that DrawObject is the same method as we use to draw the visible object on the screen. The only thing that differs is that the drawing mode is set to stencil or occlusion query. Also worth noting is how we use the rectangle to set the scissor to further reduce the workload.
void GfxObject::PrepareCollide() {
  GetGfxManager()->SetScissor(this->GetBoundingRect());
  GetGfxManager()->DrawObject(m_GfxId,GetPosition(),GetRotation(),STENCIL);
}

void GfxObject::FinishCollide() {
  // We simply reset the scissor
  GetGfxManager()->SetScissor();
}

int GfxObject::DrawCollide() {
  // We could set the scissor here to even smaller area, the overlapping area
  return GetGfxManager()->DrawObject(m_GfxId,GetPosition(),GetRotation(),OCCLUSION);
}

bool GfxObject::TestCollide(Object *obj) {
  Rect a=GetBoundingRect();
  Rect b=obj->GetBoundingRect();

  // No need for further collision testing if the rectangles
  // don't overlap
  if (!a.TestCollide(b)) return false;

  // We have a collision if any pixels were drawn
  return obj->DrawCollide() > 0;
}
Links