20 Apr

Maps in MICRO MURDER (but it’s PICO-8 so it’s hard)

MICRO MURDER: But It’s Robots So It’s OK has a deformable map (that is, you can dig holes in it) that spans multiple screens and all the collisions seem to be per pixel – the holes on the map are not limited to tile boundaries and can be of any radius (and theoretically any shape). On a modern platform (or, even a platfrom from past, as in the original Worms was an Amiga game) it would be a very simple task: store the whole map in memory as a huge bitmap and read and write from it as you please.

On a PICO-8 this is a bit more complicated task: the machine doesn’t have enough memory for having much more than a single screen’s (128×128) worth of pixels in an array and even if it did, it would be very slow to draw pixel by pixel from the array to the screen memory.

Instead, we need to combine a few things, old and new, and apply a liberal amount of smoke and mirrors.

Checking for pixels

We start the collision checking by simply using the map. Using mget() to check for tiles is of course pretty much PICO-8 101 stuff and we can add a single step to also check pixel inside the tile:

function checkpixel(x, y)
 -- transform screen coordinates to tile
 -- coordinates (8x8 tiles)
 x = x / 8
 y = y / 8

 local tile = mget(x, y)

 if tile == 0 then
  -- the tile is not set so we know
  -- there will be no pixels
  return false
 end

 -- manually check if the pixel
 -- inside the map tile is non-zero

 -- 1. find out the pixel coordinate inside 
 -- the tile. it's what's after the decimal dot
 -- scaled to tile size (8x8 pixels)

 local sx = (x - flr(x)) * 8
 local sy = (y - flr(y)) * 8

 -- 2. find out the top-left corner of the tile
 -- inside sprite memory

 local tx = tile % 16 * 8
 local ty = flr(tile / 16) * 8

 if sget(sx + tx, sy + ty) == 0 then
   -- the pixel was zero
   return false
 end

 -- there were no empty pixels
 -- so it was a hit!

 return true
end

We can now easily check every pixel inside the map. But, how do we edit the map pixel per pixel? It’s quite simple:
we just store all the holes (circles) made by projectiles and separately check if the coordinate is inside the hole.

function checkhole(x, y)
 for hole in all(holes) do
  local dx = x - hole.x
  local dy = y - hole.y
  if dx * dx + dy * dy <= hole.r * hole.r then
   return true
  end
 end
 return false
end

If we found a pixel that isn’t inside a hole, the projectile explodes and we simply add a new hole at the coordinates (with a variable radius).

So, here’s the whole thing in short:

  1. Check for if there’s a tile at the coordinate
  2. Check if the coordinate is inside a hole
  3. Check if the tile has a pixel at the “sub-tile coordinate”

Holes are drawn as white circle outlines instead of filled black circles

Note that in the above screenshot also tiles that are fully inside holes are set to empty for speed (we don’t need to check for the individual pixels because we know the whole tile is destroyed).

if checkpixel(projectile.x, projectile.y) and 
 not checkhole(projectile.x, projectile.y) then
 -- BOOM!
 add(holes, {x=projectile.x, y=projectile.y, radius=10})
end

For speed, you might want to experiment by changing the order of the checks, depending on exact circumstances. Also, you will want to use a more efficient way to store the holes if you have thousands of them.
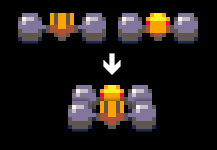
Bouncy bombs

In MM:BIRSIO, there are projectiles that collide with the map and seem to bounce quite accurately according to the slope at the collision point. How to find out the angle from the map pixels?

This is easy: you can get a normal vector by scanning the pixels surrounding the collision point and building a vector that is the sum of the vector pointing from the collision point to the scanned pixel:

-- dx,dy = normal vector at collision point
local dy=0
local dx=0

-- scan the surrounding area, 2 pixels to any direction
for sy=-2,2 do
 for sx=-2,2 do
  if not checkpixel(collision_point.x + sx,collision_point.y + sy) then
   -- found an empty pixel, add vector sx,sy to dx,dy
   dx += sx
   dy += sy
  end
 end
end

-- normalize dx,dy
local d = sqrt(dx * dx + dy * dy)
dx /= d
dy /= d

-- proceed with the usual reflection vector 
-- calculations etc.
-- ...

This is of course just an approximation but it works perfectly fine for our purposes. And, in case of collisions, the ground probably is uneven and has tiny rocks and so on so the bounce would not be mathematically perfect.

Drawing the map

You have probably realized that we have a tiny problem if we draw the map on screen like this (assuming a black background):

cls()

-- draw the untouched, original tiles
map()

-- draw the holes over the tiles
for hole in all(holes) do
 circfill(hole.x, hole.y, hole.radius, 0)
end

The above code will draw the map and holes correctly but you are now limited to a plain black background. If you draw a background before drawing the map over it, as you usually would, the holes would clearly be just black circles stamped against the background. This would ruin the illusion of having a huge, per pixel map.

In MM:BIRSIO, we simply add more smoke: instead of having some magic to make the holes somehow invisible, the starfield is drawn after the map – we manually check the pixel color and decide if the star would be behind the map or visible. This trick would probably be too slow for a full background (drawn pixel by pixel) but for a handful of pixels it’s perfectly fine.

10 Mar

How levels are generated in Spaceman 8

All levels in Spaceman 8 are procedurally generated and get larger and more complicated as the game progresses. PICO-8 has technical limitations so the map generator has to be relatively simple. The level generator works in two steps: first by generating the general structure of the level and then adding superficial details on the map that is eventually drawn on the screen. The map contains randomly placed objects that are often found in the ends of the map corridors.

The seed map

The seed map has two types of cells: “open” and “closed” cells. Map is initialized with closed cells.
All level objects (the collectables and the exits) are treated similarly.

  1. Start with single open cell in the center of the map
  2. Position all objects in the starting cell
  3. Pick a random cell on the map using these rules:
    • The cell has to be closed
    • Zero to one diagonal (NW, NE, SE, SW) neighbors have to be open
    • 1 or 2 cardinal (N, E, S, W) neighbors have to be open
  4. Change the cell type open and move an object from any of the neighboring cells or a randomly picked object in the new open cell
  5. Repeat from step 3 until map is large enough

Demo cart and code

You now have a branching, mazelike map that has all open cells connected at least from one direction. The objects should be positioned (mostly) in the ends of the corridors, further from the starting position (this of course depends on luck and you should fiddle with it if you want to make sure the object locations are always challenging).

Making it pretty

The map is upscaled so that each cell now takes twice the cells vertically and horizontally. There is a random change that a cell flips its state if the neighboring cell is of the opposite type. The resizing is done again and again so that the level corridors are suitably wide (at first they are only one tile wide, then two, four etc.). The randomness from the resizing steps carries over and adds first large and then (relatively) smaller random variation to the edges.

The visible map is built from the data using a tileset that has tiles for different edge/side combinations.

The seed map is scanned cell-by-cell and if the current tile is closed, a bitmask is built from the four neighboring seed tiles in the cardinal directions (see the linked cart for working code). The bitmask tells us the tile we want on the visible map. E.g. if all neighboring seed tiles are closed, the bitmask will be binary) 1111b = 15, we know we want to use tile 15 which is a fully filled tile. If one of the sides is open, let’s say to the east, the mask will be 1101b = 13 and we will use tile 13.

If the current seed tile is empty, the visible map will simply have an empty cell. All of this is very easy to implement when just following instructions (basically just make sure the tile order is the same and it will work) but here is a good article about the technique in case you want more details.

Demo cart and code

Finally, the visible map has some random variations added on it: empty cells have a random change to have a non-black background tile and the fully filled tiles have a random change to have a pebble tile and so on. This randomness doesn’t change the level geometry.

03 Apr

How does Pico Racer work?

After I released Pico Racer, lots of people have thought it looks nice and is an achievement. I don’t think it does anything special or pushes the limits of the Pico-8. Here I try to explain the small tricks I used in the game. If you want a general tutorial about pseudo 3D racers in general then please check out Louis Gorenfeld’s excellent page about the subject, I try to focus on Pico-8 specific stuff.

  1. Road rendering
  2. Sprite rendering
  3. Car rendering and sprite perspective
  4. Night levels and color fades
  5. Pico-8 performance

Road rendering

Usually, with pseudo 3D racers, the road is drawn using a simple trick: there is a full screen graphic of a straight road with perspective and every horizontal line gets shifted left or right, more the further down the road the current horizontal line is. This makes the road look like it’s curving. Palette tricks are used to create the familiar stripes that give an illusion of motion.

With Pico-8, there is no space for a precalculated road asset but we can draw scaled sprites instead. The road in Pico Racer is simply a series of one pixel high sprites scaled by distance, one for both track edges and two used to draw the road surface. The road is a true textured plane instead of a distorted image. Curves works similarly to the above classic method.

Additionally, when rendering the road (from bottom of the screen to the middle of the screen) we iterate along the track data. This is very approximate because we just take the screen Y, calculate the Z and figure out which part of the track the horizontal line belongs to. A more accurate way would be to iterate Z instead of the screen space Y and when Z projected to the screen gives a different screen Y coordinate, we would draw the horizontal line. But going along Y gives a good enough effect, the player will get a good enough hint what is coming towards him.

The road X position on screen is stored for each Y coordinate which we will use later to render the sprites correctly along the road. Note: this gives a slightly crude motion to sprites when they are far away because the X offset are stored per each screen Y coordinate instead of Z. As long as the action is fast, the player will not notice anything.

The road texture graphic used per line is selected so that the further away the line is, the lighter the colors in the texture. Dithering is used to mask the exact position where the texture changes.

One texture

One texture

Multiple textures

Multiple textures

Dithered textures

Dithered textures

This is done because of two reasons: in nature, colors get lighter the further away something is (actually, tint to sky blue beacuse there is air between you and the faraway object) and also so that the road sides and lane markings won’t strobe as much.

PICO-8_5

Lots of flicker

Less flicker

Less flicker

Sprite rendering

Sprites are rendered basically using the same idea as for the horizontal road lines. First, Z is used to determine the zoom factor. Secondly, sprite X position (on screen) is divided by Z and the road offset for the sprite screen Y coordinate is used to offset the sprites so that they are arranged along the road.

Car rendering and sprite perspective

There is one very important and unavoidable problem with sprites and 3D: the sprites always face the camera. This is not a problem with orthogonal 2D projection, since there is only one way the camera looks at. Everything is on one flat plane. But with a perspective projection the sprites start to look like they are always rotated to face the camera unless you take the time and draw multiple versions of the sprite from different angles. This is how Origin’s Wing Commander and Lucasarts’ Their Finest Hour work. But this takes a lot of effort and more importantly: it needs a lot of space for the sprites.

In Pico Racer, sprite perspective is handled so that most sprites (trees, warning signs) have no perspective. This works reasonably well due to two facts: the objects are two-dimensional (warning signs) AND they are always located to the sides so that the angle to them would be pretty much the same at all times. Only the player car and the opponent cars have visible perspective, since that’s what you look at the most. Also, the cars (especially the player car) have a lot of sideways motion which would immediately make the cars’ perspective look odd.

No perspective

No perspective

Sprite perspective

Sprite perspective

Full perspective

Full perspective

The cars use two tricks to fake a convincing perspective: firstly, they have multiple versions of the sprites. Secondly, the cars are built of a number of separate sprites located at slightly different distances. I borrowed this idea from Lankhor’s Vroom and it works well with cars that have no flat sides and instead have clear “sections” – just like F1 cars have. The cars have the rear sprite, the front sprite and a middle section. When the car moves sideways, in addition to showing the sprite from an angle, the rear wheels have some sideways motion against with respect to the front wheels. And, while not a perspective thing, the front section is moved sideways when the player turns left or right, when the road has a curve or when the car bounces giving the illusion the car is yawing and pitching.

Parts of the car

Parts of the car

Night levels and color fades

The color fades in Pico Racer are done using the palette mapping feature in Pico-8 and a few lookup tables. Basically, the tables tell which color to use for each of the 16 colors at a set brightness. Hand picking the colors gives the possibility (actually, with the fixed palette the fade will be tinted) to tint the fades so that they mimic sunset and so on. The road, sky and the sprites use a different lookup table each so that e.g. the road has markings visible even at pitch black and the sky and the horizon have a slightly different fade curve (because nature works like that).

Palette lookup table

Palette lookup table

It all works something like this:

PALETTE={
 {1,1,1,1,2,2,2,0},
 ...
}

FUNCTION SETFADE(LEVEL)
 FOR C=1,15 DO
  -- ALL COLORS WITH VALUE C ARE NOW DRAWN 
  -- WITH THE FADED COLOR
  PAL(C, PALETTE[C][LEVEL])
 END
END

On night levels, the cars are have rear lights drawn after it is dark enough. They are simply two extra sprites drawn without using the fade lookup palette.

Pico-8 performance

The Pico-8 is more than enough to do all the math and rendering in one frame (30 FPS). In fact, only the sprites rendering seems to be a bottleneck. Mainly, when sprites are zoomed, their area grows exponentially and the area is used to calculate how long Pico-8 takes to draw the sprite. Sometimes even large but fully clipped (i.e. outside the screen or the clip rectangle) sprites slow everything down. I found the combined area of the sprites is more important than the number of sprites.

In Pico Racer, I capped sprites so that they never zoom larger than 100 %. This has minimal effect on visuals, although you will easily notice it if you know it’s happening. Since e.g. the cars suddenly stop growing as they get closer to the camera, your brain thinks the cars in fact start shrinking. Likewise, since there is a short range where all the cars are drawn equally large, a car a bit further away looks larger than a car closer to the camera, everything because your brain expects things further down the road to be a bit smaller.

As for performance, limiting sprite size gives a big performance boost since as the sprites come very close to the camera and they get larger and larger, they very quickly get zoomed 200 %, 300 %, 600 % and so on. Further away they are just a dozen of pixels for a very long distance.

Since the area of sprites is the main contributing factor, this makes rendering the road quite efficient because every horizontal line is just one pixel high even though there are four sprites per horizontal line and 64 lines total.

27 Dec

Review: Ninja Senki

A few days ago the indie game Ninja Senki was released after a year of development. In short, it’s a Ninja Gaiden inspired (a lot of pages say Mega Man but I don’t agree with that) retro platformer that looks very late 1980s and also has that late 1980s difficulty.

The game is hard. This is why it reminds me more of Ninja Gaiden (besides the theme) than Mega Man. The gameplay is very simple, in that you can only run, jump and throw shuriken. You can also double jump once while airborne and that skill is available and required from the beginning. Which is perfectly fine. The game chooses a gameplay style and sticks to it with no afterthoughts. The gameplay feels perfect and the high difficulty doesn’t feel unfair as it would with controls that were less than perfect. The game also supports gamepads.

Ninja Senki screenshot I really liked the music and sound effects, they’re pretty much 100-percent authentic (FamiTracker was used to create the sound effects which pretty much makes it sound exactly like a NES game with the chiptune background music). The graphics are simple, obviously, since they imitate the Gameboy resolution (160×144) and the NES palette limitations. In my opinion, some of the graphics could have benefited from some variation. Especially, the few first levels look very monotone and boring compared to the later levels with more colorful backgrounds. It still looks fine, though. But as far as first impressions go, I saw more interesting stuff in the trailer than in the first few minutes of the game.

There are multiple endings depending on how well you play which is great considering how hard the game is. It feels like the game knows it’s way too difficult for 2010 so it has some slack (as long as you play your eyes open, you’ll probably be able to buy a continue or two with your score) but still would like you to play a perfect game. There are no save games which I think is not too bad considering it adds to the feeling (you have to play from beginning to end in one sitting just like you did as a kid) but since people who love retro games are not children anymore and actually have stuff to do, the game should have at least some way to continue the game.

The game is free (I was a bit surprised of this) and feels great so anyone interested in challenging platformers should check it out.