20 Feb

Let’s make a planet

For the last few days, I have been working on a planet generator. I originally got the idea from the method how you can easily tessellate sphere into triangles. This results in a spherical map instead of a cylindrical map.

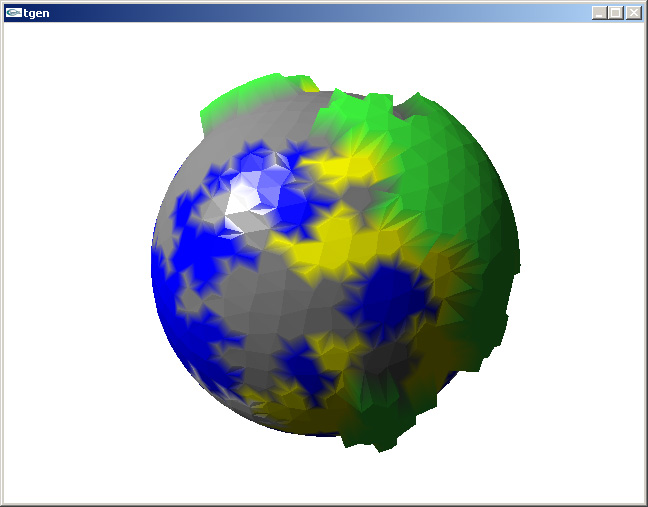
The usual way of rendering a planet as a a sphere with cylindrical texture map (or height field) looks quite bad in places because the map is stretched on the equator and pinched near the poles. The method described below takes a different approach and generates a map of vertices connected by triangles.

The vertices contain the terrain information such as terrain type (sea, land, mountain) and height. More detail is introduced by subdividing the triangles into smaller triangles.

The starting shape is an octahedron. We then subdivide each side into four triangles, normalize the new vertices and apply simple physics to move all the vertices away from the others (reverse gravity) – this eventually settles the vertices quite evenly (it won’t be a perfect shape but it is good enough for most purposes). We don’t even need to start from a symmetrical shape, using a naive repulsion algorithm eventually makes the shape symmetric as long as it is possible.

The number of subdivisions can be variable and dynamic. I’m planning to make the generator subdivide triangles on demand. In a game, you would see approximate shapes from the orbit but when flying close to the surface, the shorelines etc. would have a lot more detail. You can subdivide infinitely which means there will be infinite detail.
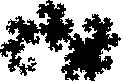
Dragon curve

I use a very simple algorithm to decide the terrain type on each vertex, simply the first point of the triangle decides the terrain type on the new triangle. This results into the Dragon curve fractal. A more sophisticated algorithm would change the subdivision rules according to the subdivision depth. For example, the same rules shouldn’t apply when subdividing on a continental scale versus to a scale of a few kilometers.

Next, I’m going to model a very simple simulation of atmosphere including prevailing winds, cloud formation and temperature.

Links

18 Feb

A simple statistics plugin for WordPress

Here’s a very simple plugin for WordPress that keeps track of view counts of individual pages. It is not intended to be a complete statistics solution. Rather, the main purpose is to provide something for those empty spots in your site layout.

Here is a sample graph (page views for this site):

For a better example, see the site stats page.

Features

  • Keeps day-by-day based page view stats using the database
  • Outputs a clean histogram
  • Includes easy functions for those who are better at blogging than programming

Installation

Copy viewcount.php in /wp-content/plugins and enable it in WordPress options. Enter the path of the directory you want to the graph cache to be located in the options page (Options > Viewcount). The plugin will then start counting page views.

Note: the plugin taps into the_content(). Pages that do not use it will not update the stats! See below for a workaround.

Usage

To display statistics, there are a few functions.

get_view_histogram($page=-1,
  $days=60,
  $barwidth=10,
  $barheight=16,
  $barspacing=1,
  $barcolor='#000000',
  $backgroundcolor='#ffffff',
  $web20=16)

get_view_histogram() returns a URL to a PNG image.

If $page is unset or is -1, the data will be the combined page views for all pages. $web20 specifies the height of a “Web 2.0” style reflection under the bars. The rest of the parameters should be easy enough to figure out.

You can use the function like this to display the statistics for the current post (or page):

<img src="<?php echo get_view_histogram($post->ID); ?>" />

You can also display a top list of page views with get_view_count_list().

get_view_count_list($limit=10,
  $days=30,
  $before='<li>',
  $after='</li>',
  $excludeid='',
  $type='')

$excludeid is a comma-separated list of post IDs (note:the list is not escaped so do not use any values in there that come straight off $_GET or so!). $type is either “post” or “page”, empty string returns both.

You can exclude the page that is currently viewed like this (shows the top five pages from the last 30 days excluding post ID $post->ID):

get_view_count_list(5,30,'<li>','</li>',$post->ID);

To display a Popularity Contest style percentage (the percentage of traffic a post has compared to other posts), use get_popularity($page=-1,$days=30,$format=’percent’). if $page equals to -1, the current page ID will be used automatically. $format can be either ‘percent‘ or ‘float‘ — ‘percent‘ returns a string with the percent sign, ‘float‘ returns a floating point number between 0.0 and 1.0. The following will display a percentage of page views for the current page during the last 30 days.

<?php echo get_popularity(); ?>

To display all time statistics, you can simply do this:

<?php echo get_popularity(-1,99999); ?>

This will display all time statistics, unless your blog has been online for more than 274 years.

To get the list of most viewed pages, use the function get_top_pages($days=30,$limit=10,$type=’views’). $type is either ‘views’ or ‘popularity’.

You can request more functions!

Download

viewcount.zip

Notes

You need the GD library installed for PHP.

I created the plugin to see how that is done. Therefore, crap code ensues (see the warning about excluding posts above).

The plugin will count views for pages and single posts only. Page views from users who are logged in (e.g. you) will not be logged.

The plugin taps into the_content() to count views. You can use vc_update_counter($id) to manually update the page views (or, you can be creative and count very different stuff with it – just make sure the ID is not in use by real pages).

In case you think the graph is wrong: the bar height is normalized. This is just so there is interesting variation in the height.

15 Feb

Customizable page layouts

I recently redesigned my site running on WordPress, which gave me some ideas about a bit more convenient layouts. I hope they are of some value to anyone who is designing their own layouts.

I wanted to tackle a common problem: on a modern (1280+ pixels wide) screen resolution it is often hard to read because the text rows are simply too long.

The easiest way to limit text width layout-wise would of course be to create a fixed-width layout. However, some viewers probably would like to have as wide text as the screen allows. Using some Javascript and DHTML magic, it is easy to make the fixed-width layout resizable. The site can even keep the same width across different pages if it is stored in a cookie.

In Javascript, you can easily change an element’s properties, here is how you would change the width of an element with the ID ‘resizable‘:

document.getElementById('resizable').style.width="500px";

Values can be saved in a cookie as follows (using / as the path sets the cookie for all pages under the domain, important if you want to keep the same width across different pages, cookie expires after days days):

var expire = new Date();
expire.setTime(expire.getTime() + 1000*60*60*24*days);
document.cookie = cookieName+"="+escape(cookieValue)+
  ";expires="+expire.toGMTString()+";path=/";

It is suboptimal to resize the layout after it loads, this will result in an annoying redraw of the page after a few moments. Using some server-side scripting, you can inject the width from the cookie so the page renders at the desired width from the beginning. On my page it is done like this:

<div style="width: <?php echo $_COOKIES[page_width]; ?>">

Probably the most technical thing when implementing the resizing is handling mouse drag in Javascript. On my page, I check if a mouse click happens on an element that has a class name of “drag” and if it is, the drag begins. If the mouse button is released, the drag ends and the resized width is calculated.

var dragging=false;
var start_x=0;

function mousedown(e) {
  if (e.target.className=="drag") {
    start_x=e.clientX;
    dragging=true;
  }
}

function mouseup(e) {
  if (dragging) {
    dragging=false;
    end_x=e.clientX;
    move_x=end_x-start_x;
    // drag ends, we moved move_x pixels
  }
}

After we know how much the X position changed, we can adjust the element width. The following code extracts the number part from the width, adds the X movement to it and again adds the ‘px’ unit in the end:

d=document.getElementById('postcolumn');
m=d.style.width.match(/(\d+)px$/i);
d.style.width=move_x+Math.round(m[1])+'px';

The element width should change by the same amount the user dragged the mouse. At this point you might want to set the cookie as described above.

That’s about it! I am quite sure someone who has no experience of doing things in Javascript and CSS doesn’t get much from the above. I intented this post to be a heads-up of sorts, this is quite easy to implement and in my opinion can be quite convenient. You can try it by dragging the right edge of this post.

If you really want to have that on your site but can’t figure out it by yourself, leave a comment and I’ll help as much as I can. Also, you can look at the source code of this page to see how I did it.

Links

01 Feb

Brain Invaders

Considering the climate change hasn’t eliminated winter yet, here’s something to keep your head warm. As a bonus, it won’t deduct from your carefully planned geek look.

kuva010.jpg

The hat inside out, note the two threads running around the hat

The pattern repeats three times around the hat (the hat is 96 stitches around which fits nicely to my adult-sized head). You can use more colors but this results in more threads running inside the hat (and probably is a bit harder to knit), maybe you could use this to your advantage and make the hat warmer.

invaders.png

Note that the above pattern is 28 stitches wide. If your hat isn’t e.g. 28*3=84 stitches wide, you have to pad the pattern with empty stitches. Add the padding stitches at the green lines, in my case there are two and two padding stitches added (i.e. there are four empty stitches between the bottom sprite) to make the pattern 32 stitches wide making the pattern fit exactly three times on the hat. Also, keep in mind the hat starts to get narrower after the pattern ends, so you can’t use the same pattern all the way to the top. In this case only two rows of sprites could be fit on the hat (I wanted a hat that isn’t floppy on the top).

Wikipedia has a pretty comprehensive article on knitting (take a look at the instructional links) but you’ll probably get the same information in a much nicer form if you ask your mom or grandmother. In any case, knitting is not hard. You just have to have some finger dexterity which most geeks have, because geeks type fast.