15 Feb

Customizable page layouts

I recently redesigned my site running on WordPress, which gave me some ideas about a bit more convenient layouts. I hope they are of some value to anyone who is designing their own layouts.

I wanted to tackle a common problem: on a modern (1280+ pixels wide) screen resolution it is often hard to read because the text rows are simply too long.

The easiest way to limit text width layout-wise would of course be to create a fixed-width layout. However, some viewers probably would like to have as wide text as the screen allows. Using some Javascript and DHTML magic, it is easy to make the fixed-width layout resizable. The site can even keep the same width across different pages if it is stored in a cookie.

In Javascript, you can easily change an element’s properties, here is how you would change the width of an element with the ID ‘resizable‘:

document.getElementById('resizable').style.width="500px";

Values can be saved in a cookie as follows (using / as the path sets the cookie for all pages under the domain, important if you want to keep the same width across different pages, cookie expires after days days):

var expire = new Date();
expire.setTime(expire.getTime() + 1000*60*60*24*days);
document.cookie = cookieName+"="+escape(cookieValue)+
  ";expires="+expire.toGMTString()+";path=/";

It is suboptimal to resize the layout after it loads, this will result in an annoying redraw of the page after a few moments. Using some server-side scripting, you can inject the width from the cookie so the page renders at the desired width from the beginning. On my page it is done like this:

<div style="width: <?php echo $_COOKIES[page_width]; ?>">

Probably the most technical thing when implementing the resizing is handling mouse drag in Javascript. On my page, I check if a mouse click happens on an element that has a class name of “drag” and if it is, the drag begins. If the mouse button is released, the drag ends and the resized width is calculated.

var dragging=false;
var start_x=0;

function mousedown(e) {
  if (e.target.className=="drag") {
    start_x=e.clientX;
    dragging=true;
  }
}

function mouseup(e) {
  if (dragging) {
    dragging=false;
    end_x=e.clientX;
    move_x=end_x-start_x;
    // drag ends, we moved move_x pixels
  }
}

After we know how much the X position changed, we can adjust the element width. The following code extracts the number part from the width, adds the X movement to it and again adds the ‘px’ unit in the end:

d=document.getElementById('postcolumn');
m=d.style.width.match(/(\d+)px$/i);
d.style.width=move_x+Math.round(m[1])+'px';

The element width should change by the same amount the user dragged the mouse. At this point you might want to set the cookie as described above.

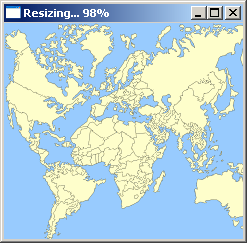
That’s about it! I am quite sure someone who has no experience of doing things in Javascript and CSS doesn’t get much from the above. I intented this post to be a heads-up of sorts, this is quite easy to implement and in my opinion can be quite convenient. You can try it by dragging the right edge of this post.

If you really want to have that on your site but can’t figure out it by yourself, leave a comment and I’ll help as much as I can. Also, you can look at the source code of this page to see how I did it.

Links

11 Nov

Compare text files in SQL

Here’s a quick hack that allows loading text files as tables in a sqlite database. Why? It’s pretty nice to compare files in SQL.

txtsql can be run as follows: txtsql.exe file.txt file2.txt ...

Every text file is loaded as a table with two columns: row (line number) and data (the actual text). When saved with save and the first column is named row, it will be skipped. Thus, every loaded table and ever table created with new will be saved as a normal text file. Any other table will be saved with tab characters separating the cells.

The program is just a test to see if this is a viable concept (post a comment if you think it is). If it seems to be something to develop further, I’ll add something like transparent loading and saving of text files as tables when they are invoked (now you have to load them with the load command), common text operations (fuzzy searching etc.) and such.

Examples

Count lines:

load `file.txt`
select count(*) from `file.txt`

Save unique lines in a new file:

load `file.txt`
new `uniq.txt`
insert into `uniq.txt` (data) select distinct data from `file.txt`
save `uniq.txt`

Find similar lines:

load `1.txt`
load `2.txt`
select data from `1.txt` where data in (select data from `2.txt`)

txtsql.zip – Binaries (Win32) and source code

22 Oct

There’s Plenty of Room at the Bottom

This is the first part of the epic (two-part) series of articles about tiny intros, the next one will be about an actual intro.

I love tiny graphical presentations called “intros” in the demoscene and by tiny I mean 256 bytes tiny. Usually, at this point people mention a paragraph of text is well over 256 bytes worth of data. However, you should not think that computer needs the same amount of data to store information such as “multiply variable X by variable Y” as we do. That textual representation needs 34 bytes of storage, less if you write it using shorter words or simply an equation. What a processor needs would be something like 3 instructions, 2-4 bytes each.

However, my point is that 256 bytes is ridiculously little for most people (even though you can hardly impress a mouth breather playing Halo 3 by stuffing amazing things in that space). At those sizes the source code is many times bigger than the resulting program. On the other hand, 256 bytes is plenty of space for those who are crazy enough to write such things. Why executables tend to be much, much bigger than that is because there is a lot of stuff in there what the programmer didn’t put in there himself/herself.

The Code

An obvious source of bloat in the executable is the fact programs are written in high-level languages such as C++ and then compiled into code that the processor can run. Compilers generally do a good job at producing working executables with fast code and they don’t even try to save space. Add tons of modern features – object polymorphism, runtime error checking et cetera – into that and you have your normal 100 kilobytes of code for the smallest program that necessarily doesn’t even do anything but exit back to desktop. On top of that, the executable file also houses information such as which libraries to use, the program icon and so on.

One way around the problem above – and it is a problem only if you for some reason are decided to spend you time doing something very few find nice – is to write the programs in more condensed languages. For example, C produces smaller code than C++ (thanks to the fact there is minimal extra fluff in C) and writing everything in assembly language produces pretty much as small code as it is possible to write because it basically is the human-readable version of machine language. A reminder: those modern languages (and C isn’t even modern as it was conceived in the 1970s) were created because writing complex things in assembly is not everyone’s cup of tea – that makes writing very tiny stuff in assembly not-everyone’s-cup-of-tea squared.

“rubba_b” by kometbomb…

… and the same for Windows – 254 bytes vs. 9278 bytes.

Another layer of arcane computing that makes a 256-byte executable possible is the use of old operating systems such as DOS. As you read above, the executable contains information about libraries and such, and back in the 80s hardly any shared libraries were used at all anyway. So, an executable pretty much was only the compiled program code and that was it. No extra fluff. Using this old executable format and assembly language the programmer essentially is the only factor that has any effect in the size of the executable.

Ironically, while old operating systems with no libraries do not provide any modern conveniences like fast 3D graphics or a mentionable interface to anything at all, this is a blessing. You can access the hardware directly which means a lot less code to do things like drawing a pixel on the screen. You don’t even have to set up those libraries because there isn’t any. As an example, the same intro (albeit converted to C code from assembly) in Windows XP is about 10 kilobytes in size, while the original version for DOS is less than 256 bytes. And, it would be even larger in Windows if it used the hardware to do the things it does in software.

The Data

Yet another reason why things like computer games or even larger intros are huge compared to the tiniest intros is because they come with a lot of precreated data like graphics and music. For 256-byte intros even a precreated flightpath for the camera is pretty much a no-go. Or, a 3D object with, say, more than four faces. That means we have to use procedurally generated data which is in the vogue right now even outside size restrictions, with things like Spore.

Actually, in many new school 256-byte intros the data is not even precalculated but simply calculated while the intro draws it on the screen. This is to save the space you would need if you had both the drawing loop and the precalculation loop (remember, even the loop structure uses precious bytes) – thanks to the fact even slow things are fast with a relatively new computer.

Speaking of slow things, one of them is raytracing. Which is purely mathematical, which means very little precreated material. Raytracing also is one way to produce realistic three-dimensional images, which as a rule of thumb, look nice. So, it’s not a surprise that a modern 256-byte intro uses raytracing, or raycasting, to simulate nature, look amazing and still fit in the specified size limit. If it’s 256 bytes and 3D, it probably uses some blend of raycasting. Older intros usually were versions of familiar 2D effects such as the rotozoomer, the fire effect, the Mandelbrot set and other well-explored routines.

The Art

Even among demo afficianados there is some controversy whether the tiniest intros have any merit as art or if they simply are a proof of concept of how small you can make something. There is no hidden gold vein as in nanotechnology in there. While most tiny intros are for the most part coder porn, nobody can deny their status as art installations. And if you stay in the 128-256 byte range, most of the popular tiny intros are quite pretty too, especially considering all the compromises that had to be made to make it fit.

The ultimate irony in downplaying the merits of the intros is that the demoscene pretty much was born from people pushing the machine to the limits. Well, nowadays to create a great demo (think of it as a large intro with many parts) you have to push your artistic talent more than the limits of the machines. It’s more like creating a music video, though, with your own tools. Seems like the final limit is the man-made limit of the smallest size you can fit something in and still call it art with a clean conscience.

04 Sep

Image retargeting

Note: See below for the updated version.

I saw this video of a SIGGRAPH paper about image retargeting (high res version here, read the paper here), that is rescaling an image so that the algorithm keeps the interesting areas intact and doesn’t squash everything. It’s called seam carving in the paper.

The video made it look amazingly simple (and actually explained the whole idea much better than most papers manage to do), so obviously I had to try my hands at it. After about three hours worth of coding I came up with my version (you can find the source code below!).

original retargeted e3.PNG
Original image Retargeted image Retargeted image

Notice how the guy’s face and the cloud stay the same even if everything else is stuffed in the smaller image area.

f1.JPG f2.PNG
Original image Retargeted image

Again, the higher contrast areas (i.e. the man and the dogs, black on white) are kept the same while the snowy area is made narrower.

map-world.gif w2.png
It’s a small world… ;)

I didn’t read the SIGGRAPH paper, so I don’t know what makes their algorithm work that well (or maybe they just chose the right images for the video). My program works as follows (when shrinking the image horizontally):

  1. For each column, traverse from top to bottom picking any of the three (or more) neighboring pixels below the current pixel

  2. Calculate the “penalty” or error, i.e. try to pick the neighboring pixel that is colored as similarly as possible compared to the one next to it (in the direction we want to shrink the image)

  3. From these paths, pick the path that has the lowest penalty and crop the pixels along the path, while moving the rows to the left, as you would delete characters in a text

  4. Repeat until the image width is what was requested

In all, this is very slow but it could be made faster (as in the video that shows realtime scaling) if the penalty or error values were precalculated for each pixel. The algorithm should also try to pick paths that are further apart, so it would remove pixels more evenly and it should backtrack when trying to find the optimal path. Now it just goes along a “wall”, i.e. a high-contrast area when it finds one – it should backtrack and try to find a path further away. Finally, there should be a feature that allowed the user to mark faces and other areas that should never be scaled.

To use the program, you need to run it from command line or drag a 24-bit BMP image on the icon. Resize the window to scale images. If you want to save the image, simply answer “yes” when exiting the program.

New version

When using the new version, you can resize to a specific size (as requested) by running the program as follows:

retarget image.bmp 800 600

This will try to resize the image to 800×600 resolution. The new version is able to load JPEG, PNG, BMP and probably some other formats too (thanks to the SDL_image library). Note that it still will save as BMP, even if the extension is JPG or so.

Use the left mouse button to mark areas such as faces, eyes and so on, and the right mouse button to mark areas that you want to remove. Middle mouse button erases the marks. To tweak the blur amount (less is better for cartoon style images and maps, the opposite for photos), run it like this:

retarget image.bmp 800 600 4

Now there will be twice as much blur as usually (default is 2).

retarget3.zip – the program with the source code (you need SDL and SDL_image)

Here’s the original version, it is still useful:

retarget2.zip – the program with the source code (you need SDL)

17 Jul

Nanopond Screensaver

[This is an archive post from my old homepage]

For those who don’t know what Nanopond is: Adam Ierymenko’s Nanopond a minimal (absolutely tiny) artificial life system based on randomly mutating and evolving computer programs that eventually get more and more efficient in copying their program thanks to natural selection. While it does not have as diverse dynamic as Ray’s Tierra but it is more interesting to look at.

See a time-lapse video of evolution in action:

This screensaver is a quick hack of Nanopond that allows it’s use as a Windows screensaver. Does not support passwords or anything fancy but it saves the pond when the saver exits. Delete nanopond.1 in the Windows directory to start over.

The pond size (and the screen resolution) is the standard 640×480, but the pond depth has been set to 64 to minimize the pond state file size (with the default settings it’s around 80 megabytes, now around 20 MB).

Download – Binaries and the source code. Extract nanopond.scr (optimized for Pentium MMX) or nanopond_athlonxp.scr (optimized for AMD Athlon XP) in your Windows directory. You need the SDL libraries.