Image retargeting
Note: See below for the updated version.
I saw this video of a SIGGRAPH paper about image retargeting (high res version here, read the paper here), that is rescaling an image so that the algorithm keeps the interesting areas intact and doesn’t squash everything. It’s called seam carving in the paper.
The video made it look amazingly simple (and actually explained the whole idea much better than most papers manage to do), so obviously I had to try my hands at it. After about three hours worth of coding I came up with my version (you can find the source code below!).
 |
 |
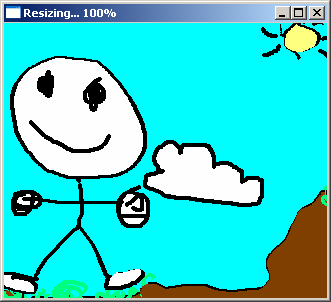 |
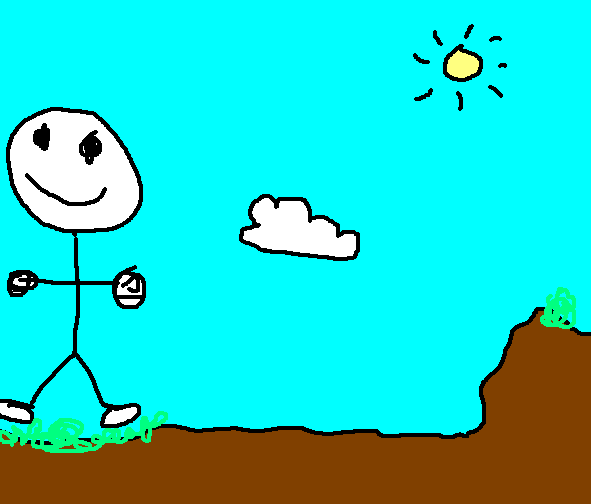
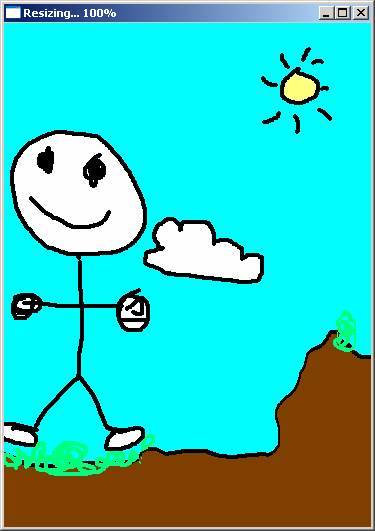
| Original image | Retargeted image | Retargeted image |
Notice how the guy’s face and the cloud stay the same even if everything else is stuffed in the smaller image area.
 |
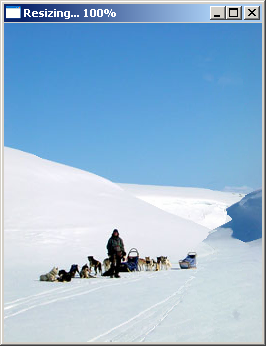 |
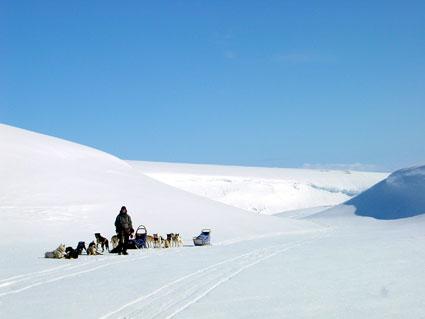
| Original image | Retargeted image |
Again, the higher contrast areas (i.e. the man and the dogs, black on white) are kept the same while the snowy area is made narrower.
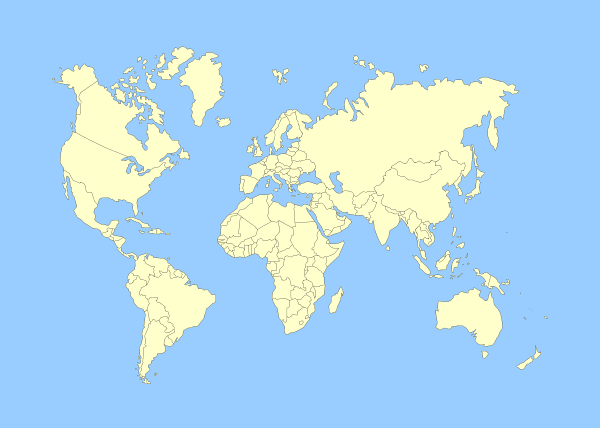 |
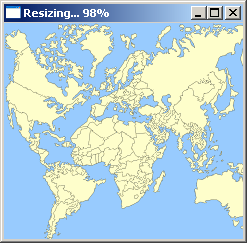 |
| It’s a small world… ;) | |
I didn’t read the SIGGRAPH paper, so I don’t know what makes their algorithm work that well (or maybe they just chose the right images for the video). My program works as follows (when shrinking the image horizontally):
-
For each column, traverse from top to bottom picking any of the three (or more) neighboring pixels below the current pixel
-
Calculate the “penalty” or error, i.e. try to pick the neighboring pixel that is colored as similarly as possible compared to the one next to it (in the direction we want to shrink the image)
-
From these paths, pick the path that has the lowest penalty and crop the pixels along the path, while moving the rows to the left, as you would delete characters in a text
-
Repeat until the image width is what was requested
In all, this is very slow but it could be made faster (as in the video that shows realtime scaling) if the penalty or error values were precalculated for each pixel. The algorithm should also try to pick paths that are further apart, so it would remove pixels more evenly and it should backtrack when trying to find the optimal path. Now it just goes along a “wall”, i.e. a high-contrast area when it finds one – it should backtrack and try to find a path further away. Finally, there should be a feature that allowed the user to mark faces and other areas that should never be scaled.
To use the program, you need to run it from command line or drag a 24-bit BMP image on the icon. Resize the window to scale images. If you want to save the image, simply answer “yes” when exiting the program.
New version
retarget image.bmp 800 600
This will try to resize the image to 800×600 resolution. The new version is able to load JPEG, PNG, BMP and probably some other formats too (thanks to the SDL_image library). Note that it still will save as BMP, even if the extension is JPG or so.
Use the left mouse button to mark areas such as faces, eyes and so on, and the right mouse button to mark areas that you want to remove. Middle mouse button erases the marks. To tweak the blur amount (less is better for cartoon style images and maps, the opposite for photos), run it like this:
retarget image.bmp 800 600 4
Now there will be twice as much blur as usually (default is 2).
retarget3.zip – the program with the source code (you need SDL and SDL_image)
Here’s the original version, it is still useful:
retarget2.zip – the program with the source code (you need SDL)
Good work. I was planning on coding this into a retargeting function for the PHP GD library this weekend when I had some time.
According to the video, if I recall correctly, they calculate the gradient of the image for their penalty function rather than picking a close color like yours. Though it appears to have similar results.
A first-order image gradient can be calculated by grayscaling the image, running a guassian smoothing filter ( http://en.wikipedia.org/wiki/Gaussian_blur ), then a sobel filter ( http://en.wikipedia.org/wiki/Sobel ) in both the vertical and horizontal directions. There are other schemes than this.
The edges in the images are said to be important so the optimization scheme takes a big hit if it has to pass through a high contrast edge.
What is not clear in that video is how they derived the subsequent energy function.
Thanks for the info! I think if someone in fact added the precalclation, this would indeed be the resulting method. It is quite clear from my example that we need a smoothing filter because even normal noise on a photo makes the pathfinding work much worse. Now it works best on maps and cartoons with very similar colors.
I bow my head before you – Congratulations !
I planned on doing it in java this weekend, and i will definetly take a look at your code.
Good Luck for your future
Thanks, phi
Actually, you should try what James described above. I tried it today (again only a few more functions, we’re still in the “quite simple” territory), and it does work better with photos. Though it’s still far from the magic in the original video. Keep me posted on your code, I want to link to it.
Does your retarget program handle enlarging images? i.e. 640×480 -> 800×600?
It only shrinks the image (removes rows/columns/paths of pixels) so far, but the reverse operation should be just as simple (just add pixels). In fact, I don’t know why I didn’t try it already. Even if it didn’t work as expected, it should look pretty interesting. :)
I never got around to coding it this weekend. It’s funny because I just got an email today from one of my instructors that stated:
…”I’ll start talking about dynamic programming next Tuesday. There is a really cool project I think we can do for that, based on a recent SIGGRAPH paper from last month.”
So I guess I ought to start on it.
Here’s the high quality video link that explains all of this (without a lot of technical details):
http://www.faculty.idc.ac.il/arik/IMRet-All.mov
And here is the paper:
http://www.faculty.idc.ac.il/arik/imret.pdf
In the paper, it explains how he derives the error map (after calculating the image gradient):
“The optimal seam can be found using dynamic programming. The first step is to traverse the image from the second row to the last row and compute the cumulative minimum energy M for all possible connected seams for each entry (i, j):
M(i, j) = e(i, j)+ min(M(i?1, j?1),M(i?1, j),M(i?1, j+1))
At the end of this process, the minimum value of the last row in M will indicate the end of the minimal connected vertical seam. Hence, in the second step we backtrack from this minimum entry on M to find the path of the optimal seam (see Figure 1). The definition of M for horizontal seams is similar.”
Thanks for the links.
OK, in the second version of my algorithm there’s a fundamental difference: I use only one gradient map and the algorithm described by the paper uses two gradient maps depending of along which axis we want to shrink the image. A quick trial shows that simply adding that feature to my algorithm makes it work much better. However, I noticed it started to evenly squash images much more. :(
Check out rsizr.com for a free Flash-based implementation of seam carving that lets you resize your own images, both in height and width simultaneously, in real time. (You can rescale and crop images too!)
http://rsizr.com/about/gallery/ for example images
I like how many implementations have sprung up around this. I did a Qt4 GUI based on Andy Owen’s library, which now uses CAIR (a multi-threaded C++ retargeting library).
So if you looking for a fast desktop version (for Mac,Windows or Linux) you might want to take a look at http://code.google.com/p/seam-carving-gui/
I agree this one is a pretty cool programming puzzle for anyone interested, because it’s relatively simple to solve and also doesn’t have just one correct solution. And best of all, it produces interesting if not usable results even if the algorithm doesn’t work that well.
Hey I have a question. Could this be helpful for procedurally generating mipmapping textures for openGL? I know its very process intensive to create the images, but if it were done at loading time that would fix that problem. The question is do you think it would be worth it at all?
Hmm, I don’t think it would be useful at all, considering a mipmap pixel essentially is an average of four pixels from the larger image. E.g. when applying trilinear texturing (i.e. you crossfade between mipmaps), the two pixels from the two different mipmap levels would not match at all.
I have to say I can’t imagine what it would look like in motion. Maybe it would look cool (especially, if you need to keep important details visible even if a polygon is very small on the screen). But it definitely wouldn’t look right.
If you decide to do this, it’s worth of telling how it went. :)
Actually, now that I thought of this again, you could try this: When drawing a polygon, figure out the polygon dimensions on the screen. Retarget the texture to those dimensions, send the new texture to the hardware and draw the polygon using the new texture. The result should be something between perspective and retargeting.
My routine is not an implementation of the algorithm described in the paper. The original routine should be more than fast enough for real-time use.
According to what I’ve read, the algorithm of Image Ratergeting is much mor complex in detail.
It finds salient areas of the image and fixes them – using algorithms like Whatershed, Graphcut etc. – after that it doesn’t resize any of these and interpolates only other areas of the image.
For every pixel of the image its “energy” (term) is calculated, ie. sand, water or sky has the lowest energy, human faces the highest. When resizing the image (and especially, which is the point of this algorithm, changing scale), the areas with points of lowest energy are interpolated, while the highest energy areas are fixed until the last moment. The chosen points with same energy or semantics are connected with “seams” and resized together.
It also counts with the fact that human brain senses much more in horizontal way than in vertical.
(source: “Pixel” 139-140, graphics magazine, Czech republic)