Plenty of Room, Part II
This is the second part of the epic (two three-part) series of articles about tiny intros, the previous part was an essay about 256-byte intros in general.
Ed. note: Since this article seems to take forever to finish, here’s the first half of it. The (hopefully) final part will detail more of the specifics.
 As stated earlier, tiny intros written in assembly language fascinate me. I have written a few in x86 assembly language, here’s one of them. I have tried to make the inner workings of the program as accessible — or, at least as thought-provoking — as possible even if assembly wasn’t their weapon of choice.
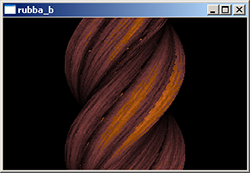
I’ve included the original DOS intro (you can use DOSBox to run it, it should also work on Windows XP) and a Win32 port of it, written in C while trying to keep the original structure intact. I’ll also try to explain the general idea of the effect in pseudocode where syntax can be an obstacle. The archive rubba_c.zip contains the source code, rubba_b.exe which is the compiled Win32 executable and RUBBA.COM which is the 16-bit MS-DOS executable. To compile the C program, you need the TinyPTC library (like SDL but even more bare-bones).
I won’t go into details about x86 assembly language, I suggest anyone interested first reads an introduction and learns some of the basics. However, I’ll try to make the code look interesting, explain some weird or obfuscated code and probably show some basic size optimization tricks.
The Effect
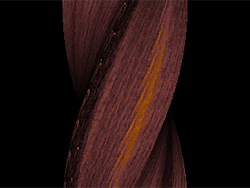
The intro, called rubba_b, shows one effect: a twisting bar drawn using primitive light-shaded texture mapping. The color palette and the texture are generated run-time. The texturing is done using linear interpolation and no vector math is used even if the bar looks like it is rotated. The lighting is an extremely simple approximation of the light source being exactly where the camera is located. That is, the length of the textured line directly determines the light.
If looked from above, the bar will be a tower of squares. If one of the squares is rotated around the center, the corners will move in a circular pattern. So, the X coordinate will be equal to cos(corner_number*(360 degrees/4)+square_rotation), the Z coordinate (why Z? Because it goes towards the screen) is equal to the sine but it can be discarded because we will not need it for perspective calculation. Remember, we’re short on bytes.
We then modulate the bar rotation for each square in the tower. If the amount of rotation changes when moving up or down the tower, the bar will twist. If the rotation stays the same for each square, the bar will rotate uniformly and look uninteresting.
The textured horizontal line is drawn from each corner to the next corner, from left to right. If the line would be drawn from right to left, we know it isn’t facing towards the camera, another line facing the camera will be drawn over it and we simply skip the line. The color value fetched from the texture is multiplied by the line length which makes short lines darker.
Still with me?
The Code
Initialization
First things first. We need to set the video mode before we continue. In the Win32 version we simply open a TinyPTC window, in the original version we need to tell BIOS to go in a nice 320x200x8 video mode (the de facto video mode back in the day).
| C | asm |
|
|
In the above code, the Win32 part is self-explanatory. The assembly bit probably needs some clarification: we put the number 13h (hex) in the 8-bit register al and we request for interrupt 10h. This is the BIOS video interrupt and since register ax (which consists of al – “low” – and ah – “high”) equals to 0013h (when the program starts, ax is always zeroed), BIOS will call the routine for changing the video mode (ah=00h) to 13h.
If above sounds complicated, don’t worry. It’s just a matter of memorization – similar to how you would memorize the function name for changing the video mode.
The next thing we need is some space for the texture, the sine table and the double buffer. In the Win32 version this is obvious, we just add a few arrays (although since TinyPTC only supports 32-bit video modes, we will also have an array for the palette). Again, in the assembly version we won’t use any fancy way to reserve memory to save some precious bytes: we simply decide certain areas of the memory will be used for whatever we want. The benefits of no memory protection and single tasking. ;)
| C | asm |
|
|
The assembly version basically sets the register dx to 60xxh-80xxh (we set only the high byte, i.e. dh to save bytes, thus the low byte of dx is undefined – it won’t matter) and puts the value into various segment registers (es-gs).
This makes it so that if we use the different segment registers, we can access each of the three 64 kilobyte segments as a 64 kilobyte array. E.g. the sine is in gs, thus mov ax,[gs:2] would move the second word in the sine table in ax. In C, the equivalent would be short int value=sinetab[1] (note how the C compiler knows the fact that a word is 2 bytes but in assembly you have to take care of that yourself – all memory accesses are always by the exact location, not the array element!).
All this is because in 16-bit memory accessing you can see only 64 kilobytes at one time. You can’t have a 128 KB array, nor can you have two 64 K arrays in the same segment. It’s something comparable to having a flashlight and a big sheet of paper in a dark room; you can move the light to show different areas but you will never see more than what there is in the spotlight.
The next two parts calculate the sine table (back in the day you simply could not do trigonometric stuff real-time, even in hardware — although in the intro it’s there just for show) and set the palette. This is pretty straight-forward stuff across the two versions. The only difference is that in the Windows version we have to remember the palette has 8-bit color components and the original has 6-bit components (0..255 ~ 0..63). And of course, the Windows version simply puts the values in a palette look-up table (because 32-bit video mode doesn’t use a palette) and the original actually sets the video mode colors.
I won’t reiterate the source code for the sine table and palette change here, I think you should be able to figure it out by comparing the source code. But in theory, here’s how to change a color: first, write the color index in port 3C8h, then write the three color components in port 3C9h (hint: dx first contains 3C8h and it’s incremented to 3C9h to save bytes).
The sine routine increases the angle (st0 the topmost register on the FPU) by 2*PI/32768 (a full circle is 2*PI, the sine table has 32768 elements). You probably should check some FPU tutorial, arithmetic on the 8087 is pretty interesting due to the stack-based architecture. For example, you first push in two numbers and then do an add, which (in most cases) pops out the two values and pushes in the result.
The texture generation bit is interesting. It also was annoying to port to C thanks to the fact you have to emulate how some instructions work – there are no accurate analogies in the C standard. A big thanks goes to baze whose code I originally cannibalized for this (I think). To be honest the conversion doesn’t work 100 % accurately but does still produce a nice texture.
The algorithm uses addition, bitwise operations and other simple things to achieve complexity thanks to how processors do arithmetics. Mainly, the results from an earlier calculation is carried over to the next calculation — when an addition or a subtraction overflows, i.e. the result is too large or too small to fit in a register, the processor lets the result wrap over but sets the carry flag.
This is quite similar to how you would carry numbers when calculating with a pen and a paper. The flag affects the results unpredictably because it’s used across quite different operations; usually you would just use to to add big numbers together as in the pen and paper example.
The Main Loop
Here is the meat of the code. The C version has many variables that are named after registers in order to see the connection with the original code. Sometimes, as with the 8-bit registers, some code doesn’t work exactly as in the original because you can’t do things similarly in C. E.g. you can’t have two variables that also are a part of one big register similarly how al and ah form ax (well, you can with pointers or unions but that is besides the point, kind of).
Self Modifying Code
I use self modifying code (SMC) in a few places because it produces faster and also much simpler code. For example, if you have a variable that is changed in a few places but used by one instruction only (and the instruction performs arithmetic or otherwise accepts a constant parameter), it’s much faster to store the variable where the constant for the instruction would be. That way you don’t have to read the variable in a register and then use the register to do something.
E.g. Let’s multiply cx by the variable foo:
| Original | SMC |
|
|
We can exploit the fact imul (signed multiplication) accepts constant multipliers. If you looked at the code with a hex editor, you’d see 123 next to the opcode. You can change the constant run-time and you do that exactly like you would change a variable: if you just define foo as the address where the constant is (the above code defines it as the last two bytes (i.e. word) of the previous instruction: in NASM, $ is the current location and $-2 equals the address of the previous word).
To be concluded…