02 Sep

Retargeting Images Using Parallax

I came up with a neat way to retarget images using a mesh that is transformed by rotating and doing an ortographic (non-perspective) projection. This is generally quite interesting since it can be done using a mesh and simple transformations and so can be done almost completely on the GPU. Even using a mesh can be avoided if one uses a height map à la parallax mapping to alter the texture coordinates so just one quad needs to be drawn (with a suitable fragment shader, of course).

The idea is simply to have areas of images at a slope depending of how much the areas should be resized when retargeting. The slope angle depends of from what angle the source image is viewed to get the retargeting effect since the idea is to eliminate the viewing angle using the slope.

Here’s a more detailed explanation:

  1. Create an energy map of the source image, areas of interest have high energy

  2. Traverse the energy map horizontally accumulating the energy value of the current pixel and the accumulated sum from the previous pixel

  3. Repeat the previous step vertically using the accumulated map from the previous step. The accumulated energy map now “grows” from the upper left corner to the lower right corner. You may need a lot of precision for the map

  4. Create a mesh with the x and y coordinates of each vertex encoding the coordinates of the source image (and thus also the texture coordinates) and the z coordinate encoding the accumulated energy. The idea is to have all areas of interest at a steep slope and other areas with little or no slope

  5. Draw the mesh with ortographic projection, using depth testing and textured with the source image

  6. Rotate the mesh around the Y axis to retarget image horizontally and around the X axis to retarget image vertically

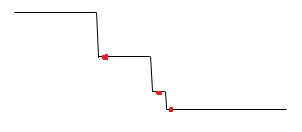
Here is a one-dimensional example (sorry for the awful images):

Source image

Source image

The red dots represent areas of interest, such as sharp edges that we don’t want to resize as much as we want to resize the areas between the details. We then elevate our line for every red dot:

red-dots

Elevated mesh

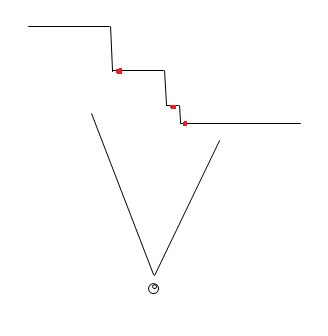
Imagine the above example as something you would do for every row and column of a two-dimensional image. Now, when the viewer views the mesh (which is drawn without perspective) he or she sees the original image:

red-dots3

Viewing the mesh from zero angle

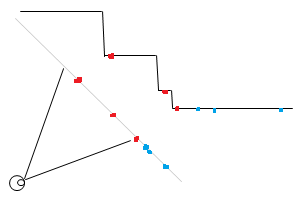
However, if the viewing angle is changed, the red dots don’t move in relation to each other as much as the areas that are not elevated when they are projected on the view plane. Consider the below example:

red-dots3

Viewing the mesh from an angle (gray line is the projected mesh)

Note how the unelevated line segments will seem shorter from the viewer’s perspective while the distance between the red dots is closer to the original distance. The blue dots in the above image show how areas that have little energy and so are not on a slope, thus will be move more compared to the red dots.

19 Jul

OpenGL, Static Arrays and glMaterialfv

I stumbled upon weird behavior of OpenGL (OGL 1.4, Catalyst 8.612, GCC if that matters): I was setting material properties with glMaterialfv and for some reason this did not change the parameters if done multiple times in succession. I.e. when I drew two versions of the same object on the screen side by side with different material parameters, they both looked the same.

The reason seems to be I was using a static array to store the parameters like this:

void set_params(const Color& diffuse)
{
  static float d[4] = {diffuse.r, diffuse.g, diffuse.b, diffuse.a};
  glMaterialfv(GL_FRONT, GL_DIFFUSE, d);
}

The only explanation I can think of is OpenGL doesn’t copy or use the values before glMaterialfv returns but instead reads them later, at which time there could be different values in the array (because it’s declared static) set for some other object being drawn. But that doesn’t explain why it can read the array (which AFAIK will be located on stack) later because the address to the then-valid location on the stack most likely won’t point to the parameters. Maybe the driver assumes anything that’s not on the stack can be used later and stuff located on stack will be copied. Who knows?

In any case, not declaring the array as static fixed the problem.

19 Aug

Out of Memory?

It’s a common practice not to check what malloc() or new returns, since in an ideal world you will never run out of memory and so allocating memory will never fail. With a reasonably sized page file that is mostly true. When using a page file, this wouldn’t be a problem since if there is free space on the drive the page file is located, virtual memory space can be temporarily enlarged (and a message pops up mentioning that) and the application that tried to allocate memory got what it asked.

However, since I upgraded to the maximum amount of memory Windows XP supports, and switched memory paging completely off, I’ve noticed some programs will silently fail when the system runs out of memory. And this isn’t that uncommon since I develop software and the crap programmer I am, silly mistakes are and always will be made that cause huge memory usage (and there’s also the rest of the software running on the computer). I have noticed at least Firefox simply disappears, while some software die with an error message.

For a game this wouldn’t be an issue (or a web browser even) but there are tons of programs downloading stuff or just hanging there that you’ll never notice missing. But it’s annoying to notice everything isn’t as you left it.

So, in case you haven’t thought of allocation failing, you probably should do something about it. When there’s no free memory left, even a malloc(sizeof(char)) will invariably fail. A lazy way out would be wrapping the allocation with something that checks if the allocation succeeded and if not, displaying a message box will halt the program until the user does something (kills the offending app reserving all that memory or frees some disk space for the page file) and then clicks “Retry” and then the wrapper simply tries to allocate again. In C++, the new operator can be overloaded.

Just my 2 cents (Euro).

Example code

C

void * my_alloc(size_t bytes)
{
  if (NULL == (ptr = malloc(bytes)))
  {
    // malloc failed, do something about it!
  }
  return ptr;
}

C++

This uses the function from above C code.

void * operator new(size_t bytes)
{
  return my_malloc(bytes);
}
Reblog this post [with Zemanta]
23 Jul

Collision Detection with Occlusion Queries Redux

Introduction

Here we describe a method for checking collisions between arbitrary objects drawn by the GPU. The objects are not limited to any shape, complexity or orientation. The objects that are checked for collisions can be the same objects that are drawn on the screen. The algorithm is pixel perfect but without further refining is limited to 2D collisions.

Description

The algorithm can be divided in three separate steps:

  1. Determine which objects need testing

  2. Set up the GPU buffers and draw the first object so the stencil buffer is set

  3. Make an occlusion query using the and using the stencil from the previous buffer

If the occlusion query returns any pixels were drawn, the two objects overlap.

Determining objects that need to be tested
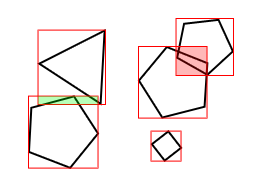
Figure 1.
Figure 1.

To speed up the algorithm, we need to eliminate object pairs that can’t overlap. This can be done by projecting the object bounding volumes in screen space. Then, we can quickly check which 2D polygons overlap and do further checking. Choosing the shape of the bounding volumes/polygons is not relevant. In this document we will use rectangles for the simplicity.

The example case in figure 1 shows two colliding objects (overlapping bounding rectangles shown red), one near hit (green overlap) and one object with no collisions or bounding rectangle overlap. To determine the collisions (and non-collisions) we need checks for every bounding rectangle (15 checks) and two checks using the GPU1. Without the use of the bounding rectangles, we would need 13 more checks on the GPU.

The bounding rectangles in the example can be generated by finding the maximum and minimum coordinates and using them as the corner points of the rectangle. Since the algorithm finds collisions as seen from the camera, we need first project the object coordinates (or the object bounding volume coordinates) on the screen and find the minima and maxima using those coordinates. Most 3D frameworks provide functions for projecting a 3D point to screen coordinates using the same transformations as seen on screen2.

Drawing objects

Before we start drawing the objects on the graphics buffer, we need to clear the stencil buffer. After that, the GPU should be set to draw only to the stencil buffer, that is we don’t need the color buffer or depth buffer to be updated.

Now, the first object can be drawn. After that, we will draw the second object. Before we start we need to set up the occlusion query to count the drawn pixels. We also need to use the stencil buffer created in the previous step and set the GPU to draw only if the stencil buffer is non-zero. We don’t need to update any buffers at this point.

After the second object is drawn, the pixel count returned by the occlusion query tells how many pixels overlap. For most purposes, we can assume a non-zero value means the two objects collide3.


Figure 2.

Figure 3.

Figure 4.

Consider the above example. Figure 2 shows two objects as seen on screen. Figure 3 shows the stencil derived by drawing only the green (right) object. Figure 4 shows what will be drawn of the red (left) object if we limit the rendering to drawing on the stencil (the occlusion query will tell us six pixels were drawn).

Sprites

For sprite objects that consist of only one quad and an alpha blended texture with transparent area representing the area that cannot collide with anything, the same result can be achieved by setting the alpha testing to discard pixels below a certain tolerance. This will then avoid updating the stencil buffer on the whole area of the quad.

Optimizations

The stencil buffer can be created to contain the collision area of e.g. every enemy currently on the screen and then testing with the player object. This avoids the necessity to test between every object individually, which can be costly since the occlusion query has to finish before the next query can start. If the objects on the screen can be grouped to a handful of categories, such as the player, the enemies, player bullets and so on, multiple objects can be tested simultaneously where it is not important to know exactly which two objects collided (e.g. when deciding whether to kill the player which in a shooter game generally is because the player collides with the background, an enemy bullet or an enemy — all of which would be drawn in the same stencil buffer).

Ideally, the above can be done so that every object group has its own stencil buffer. This then makes it possible to create the stencil and start the queries in their respective buffers, do something useful while they execute and then query for the occlusion query results.

Caveats

Most of all, doing collision detection with occlusion queries is admittedly a curiosity. There are many, many ways to do collisions faster and most likely with less technicalities. Using a simple rectangle (a cube or a sphere in 3D applications) to test collisions between complex objects has been used since the first video games and it still provides acceptable accuracy. Indeed, some games even use an extremely small collision area (e.g. a single pixel) to test collisions with larger objects with great success. Additionally, the algorithm is potentially a bottleneck, especially when triple buffering etc. are used since occlusion queries generally are started after the previous frame is drawn and then read when the next frame is drawn (i.e. it’s asyncronous). This limits either the algorithm accuracy for real time (frame accuracy) or the framerate since we may have to wait for the query to finish for a relatively long time.

A serious consideration is to use the occlusion query algorithm to test between a complex object, e.g. with a large end of level boss with a complex, changing shape and use a simpler geometry based algoritm to test between hundreds of bullets. A hybrid algorithm could even first make an occlusion query to know which objects collide and then use a different algorithm to find out more about the collision.

This is inherently a 2D algorithm. The GPU sees any situations in which two objects overlap as a collision, as seen from the location of the camera. This if fine for side-scrollers et cetera, which also benefit from pixel perfect (fair, predictable) collisions, and other situations in which all the objects to be tested are on the same plane. Multiple depth levels (e.g. foreground objects never collide with background items) improve the situation and so does drawing only the parts of the objects that are between specified depth levels4.

Another possible problem is that the screen resolution may be different between systems, which makes the algorithm have different levels of accuracy. This can be avoided by doing the checks in a fixed resolution. Limiting the collision buffer resolution also improves the algorithm speed in cases the GPU fillrate is a bottleneck.

Finally, some older systems may not support occlusion queries or stencil buffers. As of 2008, this is increasingly rare but should be taken into consideration.

Appendix A. Source code for OpenGL

The following is source code extracted from a proof of a concept/prototype game written in C++ using OpenGL. The source code should be self explanatory.

The following builds the bounding rectangle for a object:

BoundBox box=object->GetBoundingBox();

object->DoObjectTranslations();
	
glGetDoublev(GL_MODELVIEW_MATRIX, modelViewMatrix);
glGetDoublev(GL_PROJECTION_MATRIX, projectionMatrix);
glGetIntegerv(GL_VIEWPORT, viewport);

for (int i=0;i<8;i++) 
{
    GLdouble screenX, screenY, screenZ;
			
    vec3 c=box.Corner(i);

    gluProject(c.x(), c.y(), c.z(), 
        modelViewMatrix, projectionMatrix, viewport, 
        &screenX, &screenY, &screenZ);
					    
    maxX=max((int)screenX,maxY);
    maxY=max((int)screenY,maxY);
    minX=min((int)screenX,minX); 
    minY=min((int)screenY,minY);
}

rect = Rect(minX,minY,maxX-minX, maxY-minY);

The following can be used to set the rendering mode before drawing the object on the screen, on the stencil buffer or when making the occlusion query (note how we disable most of the rendering when drawing something that will not be visible to the player, also notice how the stencil buffer is cleared if we enable stencil drawing mode — using scissor makes this efficient):

void GfxManager::SetRenderMode(RenderMode mode) {
  if (mode==STENCIL) {
    glDepthFunc(GL_ALWAYS);
    glDisable(GL_LIGHTING);
    glClear(GL_STENCIL_BUFFER_BIT);	
    glEnable(GL_STENCIL_TEST);
    glDisable(GL_DEPTH_TEST);
    glStencilFunc(GL_ALWAYS, 1, 1);						
    glStencilOp(GL_REPLACE, GL_REPLACE, GL_REPLACE);				
    glColorMask(0,0,0,0);	
  } else if (mode==OCCLUSION) {
    glDepthFunc(GL_ALWAYS);
    glDisable(GL_DEPTH_TEST);	
    glDisable(GL_LIGHTING);
    glEnable(GL_SCISSOR_TEST);
    glEnable(GL_STENCIL_TEST);			
    glStencilFunc(GL_EQUAL, 1, 1);						
    glStencilOp(GL_KEEP, GL_KEEP, GL_KEEP);		
    glColorMask(0,0,0,0);			
    glBeginQueryARB(GL_SAMPLES_PASSED_ARB, m_OccId);
  } else {
    // Set normal rendering mode here (enable lighting etc.)
  }
}

Similarly, the following is used to end drawing (specifically to end the collision testing, at which the function returns the number of pixels drawn)…

int GfxManager::FinishRenderMode(RenderMode mode) {
  if (mode==OCCLUSION) {
    glEndQueryARB( GL_SAMPLES_PASSED_ARB );
    GLuint occ=0;
    glGetQueryObjectuivARB( m_OccId, GL_QUERY_RESULT_ARB, &occ);
    return (int)occ;
  } else {
    return 0;
  }
}

… using something like this:

int GfxManager::DrawObject(int oid,vec3 pos,vec3 rot,RenderMode mode) {
  SetRenderMode(mode);
  Draw3DObject(oid, pos, rot);
  return FinishRenderMode(mode);
}

This is from the main loop, it simply goes through all objects in the game. Notice how we first prepare the collision checking for the first object to be tested (i.e. create the stencil as in step 2 of the algorithm).

for (unsigned int a=0;a<m_Objects.size();a++) {
  m_Objects[a]->PrepareCollide();
  for (unsigned int b=a+1;b<m_Objects.size();b++) {
    if (m_Objects[a]->TestCollide(m_Objects[b])) {
      // We have a collision
    }	
  }
  m_Objects[a]->FinishCollide();
}

Note that DrawObject is the same method as we use to draw the visible object on the screen. The only thing that differs is that the drawing mode is set to stencil or occlusion query. Also worth noting is how we use the rectangle to set the scissor to further reduce the workload.

void GfxObject::PrepareCollide() {
  GetGfxManager()->SetScissor(this->GetBoundingRect());
  GetGfxManager()->DrawObject(m_GfxId,GetPosition(),GetRotation(),STENCIL);
}

void GfxObject::FinishCollide() {
  // We simply reset the scissor
  GetGfxManager()->SetScissor();
}

int GfxObject::DrawCollide() {
  // We could set the scissor here to even smaller area, the overlapping area
  return GetGfxManager()->DrawObject(m_GfxId,GetPosition(),GetRotation(),OCCLUSION);
}

bool GfxObject::TestCollide(Object *obj) {
  Rect a=GetBoundingRect();
  Rect b=obj->GetBoundingRect();
	
  // No need for further collision testing if the rectangles
  // don't overlap
  if (!a.TestCollide(b)) return false;
	
  // We have a collision if any pixels were drawn
  return obj->DrawCollide() > 0;
}

Links

  1. To speed up the checks done on the GPU, we can set the scissor rectangle to the overlapping area. This helps in cases in which the overlapping area is small compared to the complete area of the object.
  2. OpenGL has gluProject(), DirectX has D3DXVecProject()
  3. It may be useful to consider a larger tolerance for fairness’ sake
  4. E.g. setting the near and far clipping planes to the distance of the second object (assuming it won’t be a problem that the clipping results in objects that have a hole)
25 Apr

Blog Experiment: More SQL and Text Matching

In Viewer2, there is a feature that allows fast text searches on huge databases with tens of thousands of filenames (and associated photo captions and other meta data). Here’s how I did it.

The simple approach

The easiest way to find all filenames (the following article talks about filenames but you can use this to search for any text) matching $query (the string we are looking for) can be done a bit like this:

SELECT `filename` FROM `files` WHERE `filename` LIKE '%$query%'

Similarly, you could perform for multi-word searches by adding one test for each word you have extracted from the query string. And, you can very easily extend the syntax to include exclusions. Below is the equivalent SQL query for the query string [kitten -jpg] (filenames with the text ‘kitten’ but not the string ‘jpg’):

SELECT `filename` 
  FROM `files` 
  WHERE `filename` LIKE '%kitten%' 
    AND `filename` NOT LIKE '%jpg%'

The above works well but it can be very, very slow because it has to go through all entries in the table files to find matching rows. Speed can be improved by having queries like LIKE 'word%' but this limits the searches and in the end doesn’t give too much extra speed.

And if you are performing fuzzy searches…

Using a token-based approach

A lot of speed can be gained by splitting the filenames and the searched text into tokens and then performing the search using the tokens. I ended up using the following structure (SQLite syntax):

CREATE TABLE `files` (
  `file_id` INTEGER PRIMARY KEY AUTOINCREMENT,
  `filename` TEXT
);

CREATE TABLE `tokens` (
  `token_id` INTEGER PRIMARY KEY AUTOINCREMENT,
  `word` TEXT UNIQUE
);

CREATE TABLE `link_file_token` (
  `token_id` INT, -- Foreign key to the table `tokens`
  `file_id` INT   -- Foreign key to the table `files`
);

The idea is that each word in the filename can be represented with a single index to the `tokens` table. Thus, you can also search by a single integer instead of text comparison. You have to compare text only when generating the tokens (which is extremely helpful if you are using a comparatively expensive comparison).

First, when you insert the a file in the files table, you split the filename into words and link the file and the tokens (which may already exist in the `tokens` table). Later, when you need to perform a search, you do the same but use the generated tokens to search matching links.

The filename ‘Cute kitten picture.jpg‘ can be split in four tokens which results to four links between the token table and the file table. I also split words when the case between characters changes (splits filenames like ‘CuteKittenPicture.jpg‘) but this is up to you. In my implementation the tokens are also case-insensitive.

Searching using tokens

Here is a simple example query that finds matching files using the approach described above:

SELECT `filename` 
  FROM `files` 
  JOIN `link_file_token` USING `file_id` 
  WHERE `token_id` IN (
    SELECT `token_id` 
    FROM `tokens`
    WHERE `word` LIKE '%$query%'
  )

The subquery first finds all `token_id`‘s that match the query and then the main SELECT finds all filenames that have that `token_id` linked to them. Obviously, this restricts the query to simple OR queries. This is because the text matching is done in one word scope instead of a longer string (using the above filename as an example, a single word can’t match both ‘cat’ and ‘cute’).

Here is how you would do a query like [cat OR dog]:

SELECT `filename` 
  FROM `files` 
  JOIN `link_file_token` USING `file_id` 
  WHERE `token_id` IN (
    SELECT `token_id` 
    FROM `tokens`
    WHERE `word` LIKE '%cat%' OR `word` LIKE '%dog%'
  )

To perform an AND in the search query you need a query like this:

SELECT `filename` 
  FROM `files` 
  JOIN `link_file_token` ON `files`.`file_id` = `link_file_token`.`file_id`
    AND `token_id` IN (
      SELECT `token_id` 
      FROM `tokens`
      WHERE `word` LIKE '%kitten%'
    )
  JOIN `link_file_token` ON `files`.`file_id` = `link_file_token`.`file_id`
    AND `token_id` IN (
      SELECT `token_id` 
      FROM `tokens`
      WHERE `word` LIKE '%cute%'
    )

In the above example, using a natural JOIN handles the removal of all rows that only match one of the two searched words. Don’t forget that you can do the same in many ways. For example, you can use INTERSECT (do mind though that if you intersect two result lists of strings, it might be much more resource demanding than intersecting two result lists of integers).

Evaluation order

Keep in mind that if you combine the above AND and OR queries (by adding a OR `word` LIKE… for each OR’d word), it will not work as expected. Boolean algebra states the correct order to evaluate the two operators is AND first and then OR (the relation is similar to multiplication and addition, which may help you remember that). Above, it will work the opposite, the OR is evaluated before the AND.

If you restructure the query so that it, for example, returns indexes to the files table, you can implement correct evaluation order by adding a UNION for each OR term. In effect, you first use the above query to find each pair of terms AND’d and then combine all those queries with UNION.

For the query [cat cute OR dog drooly], the resulting SQL query will look something like this:

SELECT `filename` FROM `files` JOIN ... -- cat AND cute
UNION
SELECT `filename` FROM `files` JOIN ... -- dog AND drooly

Further ideas

To implement a NEAR operator, or when it is important that the searched words are in a certain order (in short strings like filenames it’s usually not at all necessary), you could add a field in the file-token links that tell the index of the word in the original string. When you have searched for the results using the above method, you then score the results based on the distance between the tokens.

E.g. if you are looking for [cute kitten], and a result has the text ‘Here is a cute dog. It is not a kitten’, the indexes for the words ‘cute’ and ‘kitten’ will be 4 and 10. Thus, the result should have a worse score than some other piece of text with the exact word order.

Notes

In Viewer2, the exact implementation doesn’t use subqueries like described above. Instead, I first generate a longer query that has the needed `token_id`’s and other stuff filled in (a comma separated list of integers in place of the SELECT subquery). You might consider this to gain some more speed but do experiment before you optimize.

Take note that even SQLite has a similar feature called FTS2. In theory, it should provide most if not all of the above. My example is still useful if you need more control over how the text is tokenized and compared (and I think in the case of FTS2 enabling full text searching requires double the storage, if you don’t want to store all the text data in the full text search table).

As always, research before you start doing something you think someone probably already did.